Want to join us?
The following page will guide you through the process of creating an account and your first article for the Beyond Social webzine.
Welcome
Thank you so much for joining us in making the Beyond Social webzine a success! Naturally, we cordially invite all those who are interested to join us. Because we want to abide by a high standard for our webzine, there are some rules on how to submit an article. We are trying to have as few constraints on your creative input as possible, but at the same time we still want to guarantee that high standard.
Some background information
The back end of our webzine is a Wiki, an internet collaboration and web page hypertext creation software well-known for being part of Wikipedia and its subsidiaries. If you are well-known with editing Wiki pages, you shouldn't have any problem creating a Wiki page for the Beyond Social webzine. You will need to adhere to some of the house rules that we have here at Beyond Social to ensure that your page is properly included in the website. If you do not have any experience with a wiki, don't back out either: this instructable will inform you of the basics of the Wiki system and will enable you to write your article or story in no time!
Creating an account and logging in
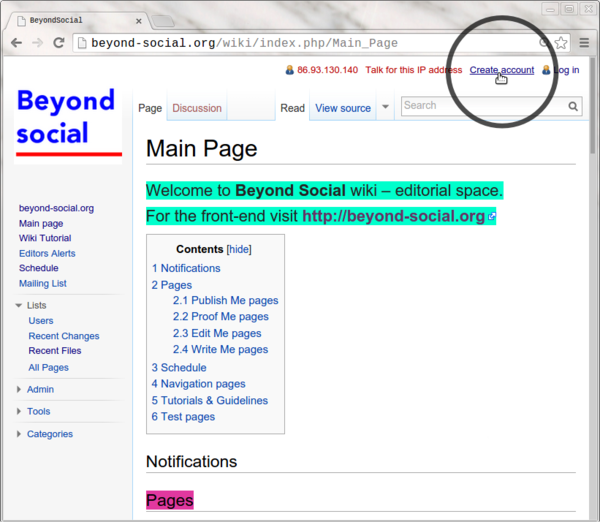
The first step is to create an account. First, go to http://www.beyond-social.org/wiki/ and click on "Create Account"
Next, complete the rest "Beyond Social - Magazine Investigating Social Art and D ....." with the word Design, so we know you are not a robot, perhaps you are one.
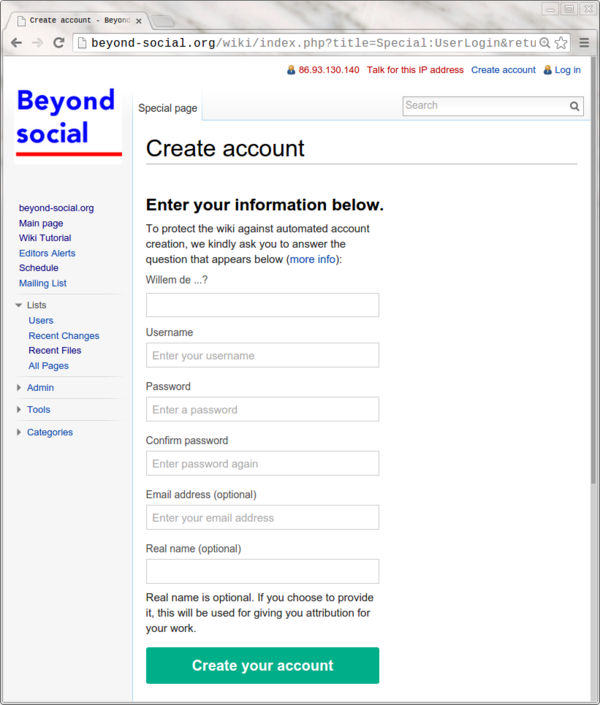
Next, you can login using the [i]login[/i] button above.
Creating your first Article
Creating a new page
To create a new page, select the URL and modify it so that it reads as follows:
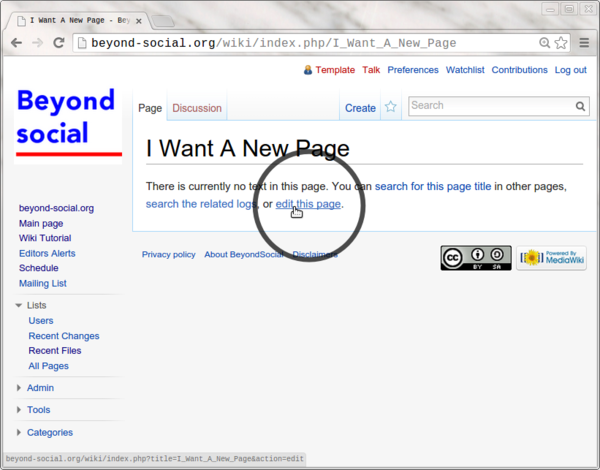
http://www.beyond-social.org/wiki/index.php/[Name of your article][Name of your article] is the name you would like to give your article, only allowing letters (lower capital or capital) and spaces represented by an underscore (_). In the example below, the article would be called "I Want A New Page". Don't forget the underscores, otherwise the title will become "IWantANewPage"!

Next, click on enter and you will be presented with a blank page, informing you of the fact that your title is indeed a new title. Click on the 'edit' button to proceed.
Writing your article; some necessities
The first row should contain the author's name, formatted like this: Author: [Name of the author], followed by an empty row.
Using Headers
There are five headers in a normal wiki. The first header is reserved for the title of the article. This means that you can use header two to five in the article.
Headers are marked in the wiki by using the equality sign (=). Simply include your header between the number of equality signs equal to the level of the header you would like to use.
So, for header two, one would use == This is a level two header ==, for header three one would use === This is a level three header === and so on.
This results in the following headers:
Header level 2
Lorem ipsum dolor sit amet.
header level 3
Lorem ipsum dolor sit amet.
Header level 4
Lorem ipsum dolor sit amet.
Header level 5
Lorem ipsum dolor sit amet.
Writing your article; some markup tricks
If you are competent at editing wikis, you can skip this part of the tutorial. Should you need any more information regarding markup, please refer to the Wiki tutorial available on the main page of the Beyond Social Wiki.
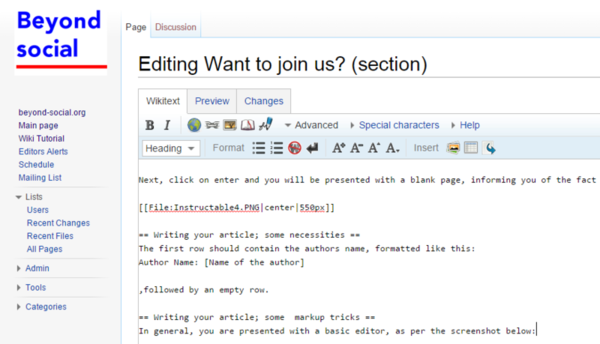
In general, you are presented with a basic editor, as per the screenshot below:
This area contains standard options like bold and italic, although it is also possible to use the shortcuts ''I''talic(two apostrophes) and '''B'''old(three apostrophes) to write in Italic or Bold, respectively. There is also the option for bullet points (*) or numbered points (#). Do pay attention that this doesn't create a real heading, however. For that, there is another markup, discussed below.
Including media
If you want to incorporate media, there are a number of ways to do this in the editor.
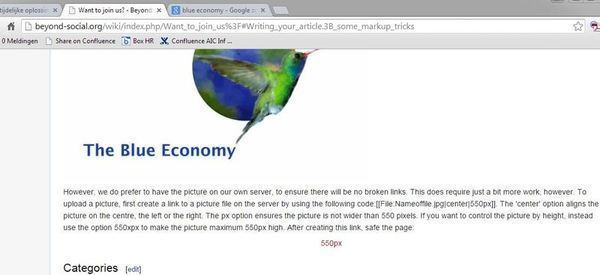
One option is to simply insert an URL to a picture, such as this: http://opinion.bdnews24.com/wp-content/uploads/2014/09/Blue-economy.jpg. This has the following result:
However, we prefer to have the picture on our own server to ensure that there will be no broken links. This does require just a bit more work, however. To upload a picture, first create a link to a picture file on the server by using the following code:[[File:Nameoffile.jpg|550px]]. Note that the name must include the extension of the file you would like to upload. The 'center' option aligns the picture at the centre, the left or the right. The px option ensures the picture is not wider than 550 pixels. If you want to set the picture by height instead, use the option 550xpx to make the picture 550px high max. After creating this link, save the page. You will be redirected to the READ mode of the wiki, where your empty picture link will be represented in red like this:
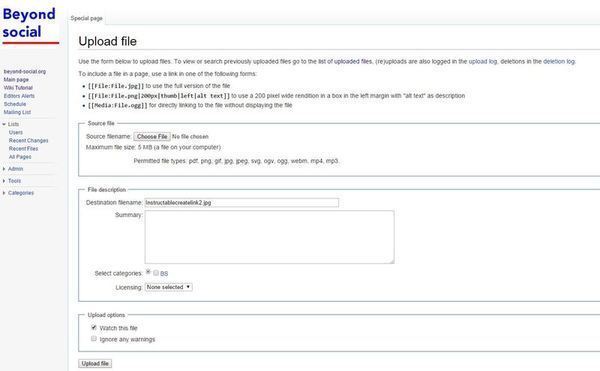
Now if you click the link (in this case called "550px"), you will be redirected to a filepicker dialog. Choose the file you want to upload and click "Upload".
Go back to the page you were editing (simply by clicking on 'Contribution' in the right hand menu) and you will see that the picture is uploaded.
Including a Youtube movie is even easier. Simply include the youtube video id (the part after watch?v=, i.e. https://www.youtube.com/watch?v=IGfPsUtCzkc) into youtube tags, like this: <youtube>IGfPsUtCzkc</youtube> and your video will be embedded in the page like this:
Creating Links
Perhaps you want to link to an external webpage. If you want to show a link, you can simply write down the link like this http://www.beyond-social.org/. This will then look like this http://www.beyond-social.org/. If you would like to give a name to your link, include it in square brackets with a space between the URL and the name you would like to display like this:[http://www.beyond-social.org/ The Beyond Social webzine]. This results in a link to The Beyond Social webzine.
Creating an internal link (i.e. to another article) basically works the same way, although one should use two square brackets, such as this [[Wiki tutorial]].
Categories
The hypertext created on the wiki is processed in such a way that it can be presented on the website. In order to position the article on the correct location on the website, we have included a number of categories which ensure the article will be shown at the correct location and can be processed by the editorial board before it is presented on the website. The following categories are used:
Category |
Description |
|---|---|
Issue |
The issue in which the article will be presented. |
Section |
The section of the magazine in which the article will be presented |
Topic |
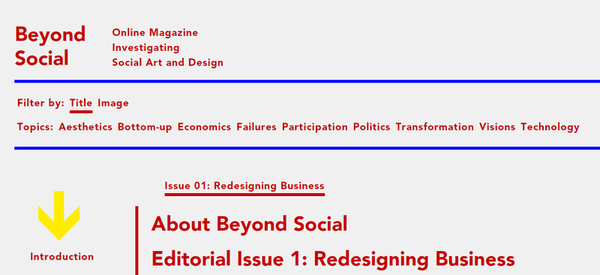
The topic of your article. This will determine how your article can be found on the wiki using the 'Topics'; see the picture below |
State |
The current state of the article. One of the most important categories to which the strongest house rules apply. See also State of the article for more information. |
State of the article
An article can have one of four states, each of which serves a distinct role within the wiki. Two states are available to you as an author of the wiki; the other states are reserved for the editorial board and for the website mechanics. Note that there is no mechanical security incorporated in the website to ensure you will not make use of the states of the editorial board. The editors make a general moral appeal to the public to use the website as it is meant to be used and they will frequently check whether it is still used according to the rules laid out here.
01 Write Me
This state is reserved for the writers of work in progress. The editors will generally not look at the articles at this state. If you want to save an article for yourself before finished it, this is the correct state for you.
02 Edit Me
This state is reserved for the editors. If you have finished your article, change the category to 02 Edit Me in order for the editorial board to check your work. If they think it needs revising, they will revert the article to the 01 Write Me and will instruct you accordingly.
03 Proof Me
If the Editor approves your article, (s)he will give it the 03 Proof Me state to make sure any grammatical errors are corrected. Since a lot of articles will be produced by non-native English speakers, this step is crucial to ensure any spelling or grammatical mistakes are corrected.
04 Publish Me
Finally, if the proof reader has assessed and corrected your work, it will be placed on the 04 Publish Me state. It will then be placed on the website and can be read by the audience.


